Goped & Scooter-Tuning
Racing exhaust
Racing carburetors
Racing cylinders
Tuning
and more...
Product search
Info
Newsletter
Downloads
Any questions? Call us!
+49 9491 954499.
|
Pocket Bike -
Tuning Anleitungen
Installation instructions Rocket Key
Carb adjusting
Pocket Bike Walbro WT-603 Reed Assy Carb Kit
Pocket Bike Assembly instructions for Walbro WYK-Barell Carb Kit
Assembly instructions Billet Reed Assy for Stock Carb
Pocket Bike Assembly instructions Billet Reed Assy for Dellorto SHACarbs
Pocket Bike Walbro WT-603 Reed Assy Carb Kit
Pocket Bike Assembly instructions Billet Reed Assy for Walbro WYK-Barell Carb
Installation Instructions Rocket Key
- Remove fan cover, leaving pull start attached
- Remove flywheel nut
- Thread the 6mm puller bolt into one of the threaded holes in the flywheel
- Tighten bolt against case behind flywheel (look for high spot on case) until flywheel pops off
- Remove stock woodruff key from crankshaft
- Wipe end of crankshaft clean
- Apply a small amount of grease to crankshaft end and keyway
- Install the Timing Advance Key with the offset on the right side (towards rear of Go-Ped)
- Re-install flywheel, lining up the keyway in the flywheel with the Timing Advance Key
- Press flywheel on as far as possible by hand, it may be tight going onto Timing Advance Key
- Install flywheel nut and tighten
- Re-install fan cover
- Re-check flywheel nut after first 5 minutes of use
NOTE: Timing Advance Key replaces the stock woodruff key
up
Carb adjusting
Tuning of the Walbro carburetor requires patience, this is a high performance modification. Do not expect to bolt the carb kit on, set it to the initial settings, and have it run perfect. Walbro carb tuning is affected by atmospheric conditions (i.e. altitude, air temperature, humidity), other engine modifications (i.e. pipe, reed, porting), gearing, and gas/oil ratio.
Set the carb to the initial settings, 2 turns open on the high speed and 1-1/2 turn on the low speed. You will need to turn the screws clockwise until they lightly stop, do not over tighten. Then back out the screws to the initial settings. When fine tuning, adjustments should be done in small increments, 1/16th of a turn. Plus, you need to pay close attention to the changes that are made. If an adjustment makes it run worse, then turn the adjustment screw the other way. It is always better to first adjust richer, screw out, then adjust leaner. Running too rich will not hurt the engine, it may only foul a spark plug. Too lean of a setting can result in a piston seizure, damaging the piston, rings, and cylinder wall. The low speed screw will also affect the idle, if the low speed is set too rich, it will not idle.
up
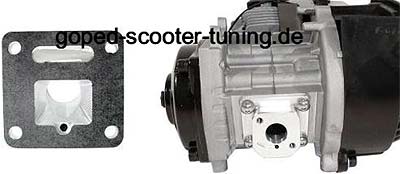
Pocket Bike Walbro WT-603 Reed Assy Carb Kit
- They dismantle the old air filter, carburettor and the intake manifold. Clean the Crank Case from the old casket.
- Mounting the Reed Assy with the Gaskets.
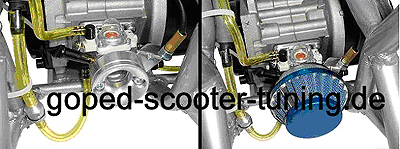
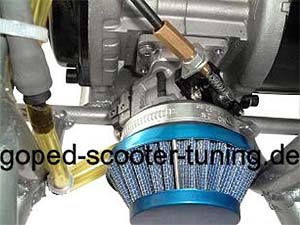
- Install the throttle cable into the carb as shown. Insert the cable into the barrel and hook the end of the cable into the swivel on the Walbro WT-603 carb. Be sure that the throttle cable does not come in contact with the exhaust pipe or that it gets kinked when the bars are turned in either direction. Bolt the carb and velocity stack onto the billet manifold using the supplied 5x50mm allen bolts, lock washers, and flat washers. There is no gasket in-between the carb and velocity stack, as the carb has an oring.
- Install air filter. You will need a 1-3/4” clamp on style filter when using the velocity stack provided. Install fuel lines with the supply line feeding the multi-barbed fitting straight out the bottom of the carb and the return line connecting to the Tank Cap. This carburetor requires that a supply and a return line is used. Plugging the return line can result in the carb not being able to be tuned properly. The clear bulb on top of the carb is a fuel circulation pump, not a primer. This will not pump fuel into the engine, it will only fill the circuits in the Walbro carb. It is best to pump this bulb a few times before starting a cold engine, making sure the bulb has fuel in it.
up
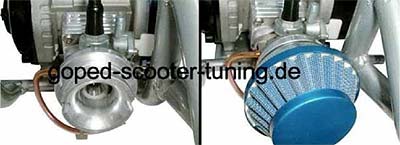
Pocket Bike Assembly instructions for Walbro WYK-Barell Carb Kit
- They dismantle the old air filter, carburettor and the intake manifold. Clean the Crank Case from the old casket. Mounting the Reed Assy with the Gaskets.
- Install the throttle cable into the carb as shown. Insert the cable into the barrel and hook the end of the cable into the swivel on the WYK carb. Be sure that the throttle cable does not come in contact with the exhaust pipe or that it gets kinked when the bars are turned in either direction. Bolt the carb and velocity stack onto the billet manifold using the supplied 5x50mm allen bolts, lock washers, and flat washers. There is no gasket in-between the carb and velocity stack, as the carb has an oring.
- Install air filter. You will need a 1-3/4” clamp on style filter when using the velocity stack provided. Install fuel lines with the supply line feeding the multi-barbed fitting straight out the bottom of the carb and the return line connecting to the Tank Cap. This carburetor requires that a supply and a return line is used. Plugging the return line can result in the carb not being able to be tuned properly. The clear bulb on top of the carb is a fuel circulation pump, not a primer. This will not pump fuel into the engine, it will only fill the circuits in the carb. It is best to pump this bulb a few times before starting a cold engine, making sure the bulb has fuel in it.

- Put he Airfilter on the Walbro WYK Carb.
up
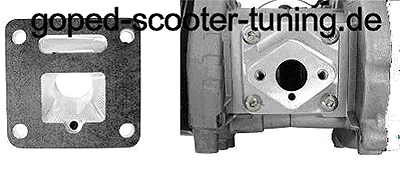
Assembly instructions Billet Reed Assy for Stock Carb
Step 1
They dismantle the old air filter, carburettor and the intake manifold from your pocketbike.
Clean the Crank Case from the old casket.
Mounting the Reed Assy with the Gaskets and Carb on the Intake Manifold at the Crank Case.

Step 2
They fit the carburettor with the screws at the intake manifold, insert a gasket between carburetor and intake manifold.
But the Air Filter Adaptor at the Carb after this the Air Filter at the Adaptor
up
Pocket Bike Assembly instructions Billet Reed Assy for Dellorto SHACarbs
Schritt 1
They dismantle the old air filter, carburettor and the intake manifold form the pocket bike.
Clean the Crank Case from the old casket.
Mounting the Reed Assy with the Gaskets and Carb on the Intake Manifold at the Crank Case.

Schritt 2
They fit the carburettor with the screw at the intake manifold, insert a gasket between carburettor and intake manifold. But the Air Filter at the carb.
up
Pocket Bike Walbro WT-603 Reed Assy Carb Kit
 |
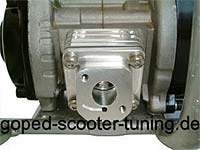
Step 1
They dismantle the old air filter, carburettor and the intake manifold.
Clean the Crank Case from the old casket. Mounting the Reed Assy with the Gaskets.
|
 |
Step 2
Install the throttle cable into the carb as shown. Insert the cable into the barrel and hook the end of the cable into the swivel on the Walbro WT-603 carb. Be sure that the throttle cable does not come in contact with the exhaust pipe or that it gets kinked when the bars are turned in either direction. Bolt the carb and velocity stack onto the billet manifold using the supplied 5x50mm allen bolts, lock washers, and flat washers. There is no gasket in-between the carb and velocity stack, as the carb has an oring. |
 |
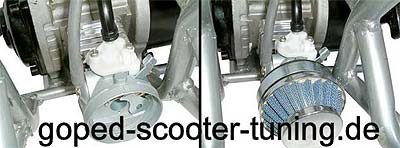
Step 3
Install air filter. You will need a 1-3/4” clamp on style filter when using the velocity stack provided. Install fuel lines with the supply line feeding the multi-barbed fitting straight out the bottom of the carb and the return line connecting to the Tank Cap. This carburetor requires that a supply and a return line is used. Plugging the return line can result in the carb not being able to be tuned properly.
The clear bulb on top of the carb is a fuel circulation pump, not a primer. This will not pump fuel into the engine, it will only fill the circuits in the carb. It is best to pump this bulb a few times before starting a cold engine, making sure the bulb has fuel in it.
|
up
Pocket Bike Assembly instructions Billet Reed Assy for Walbro WYK-Barell Carb
 |
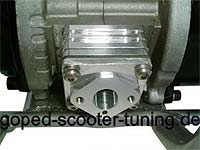
Step 1
They dismantle the old air filter, carburettor and the intake manifold.
Clean the Crank Case from the old casket. Mounting the Reed Assy with the Gaskets.
|
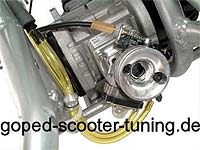 |
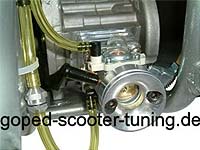
Step 2
Install the throttle cable into the carb as shown. Insert the cable into the barrel and hook the end of the cable into the swivel on the WYK carb. Be sure that the throttle cable does not come in contact with the exhaust pipe or
that it gets kinked when the bars are turned in either direction. Bolt the carb and velocity stack onto the billet manifold using the supplied 5x50mm allen bolts, lock washers, and flat washers. There is no gasket in-between the carb and velocity stack, as the carb has an oring.
|
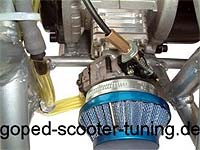 |
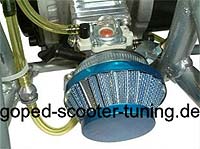
Step 3
Install air filter. You will need a 1-3/4” clamp on style filter when using the velocity stack provided. Install fuel lines with the supply line feeding the multi-barbed fitting straight out the bottom of the carb and the return line connecting to the Tank Cap. This carburetor requires that a supply and a return line is used. Plugging the return line can result in the carb not being able to be tuned properly.
The clear bulb on top of the carb is a fuel circulation pump, not a primer. This will not pump fuel into the engine, it will only fill the circuits in the carb. It is best to pump this bulb a few times before starting a cold engine, making sure the bulb has fuel in it.
|
up
|
Eine Vielzahl von Angeboten neben Pocket Bike, Go Ped, Scooter,
sind Ersatzteile und Tuningteile für alle Produkte.
|
